P120 SUSPENSION
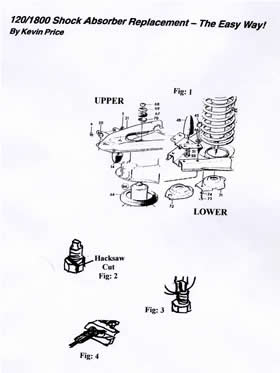
120/1800 Shock Absorber Replacement – The Easy Way! By Kevin Price
Following my successful articles on rebuilding ‘The easy way’ the front suspension of the 120/1800 Series I now turn my attention to front shock absorbers.
Replacement of these units is fairly straight –forward and the system can also be used on 140 and 164 models.
My Method is simple but you will need two jacks.
Step 1/ Remove hub cap if fitted any loosen wheel nuts
Step 2/ Lift the car by placing jack under main suspension crossmember making sure handbrake is applied car is in gear and rear wheels blocked, thus stopping the car from rolling and allowing the suspension to hang down.
Step 3/ Place Axle Stands under body for safety and remove road wheel.
Step 4/ WORK ONLY ON ONE WISH-BONE AT A TIME.
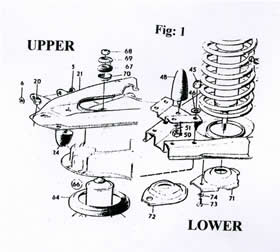
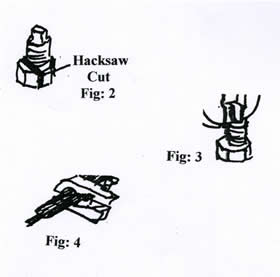
Step 4/ Remove Nut (No.68), washer (No. 69) bush (67) and special washer (70) (Make note of order where washer/bushes fit for reassebly. If you have problems removing nut because Shock rotates you can either:
- Hacksaw off nut
- Hacksaw part through Nut (See fig 2) which will allow not to undo
- Place pair of Molegrips on flats on end of Shaft, which will allow nut to be undone (fig3)
Step 5/ Its now time to turn your attention to the Lower wishbone. Two types of mounting plates
Were used – two bolt (later prod) or one bolt (early prod). Once you have identified which type is fitted to your car the one or two bolts should be removed. Take care when removing bolt/bolts as shock may drop. Nuts are welded to wishbone so if you shear off bolds there will have to be drilled and re-tapped with a thread.
Step 6/ Shock absorber and mounting plate can now be removed. You may need to use a screwdriver to prise it away from wishbone. If there is not enough height between wishbone and floor you may need to use a second jack under lower wishbone or raise centre crossmember jack.
Step 7/ Removal of the old Shock Absorber from mounting plate Is easy with a vice, a Pair of Mole Grips or using a ball joint splitter to hold shock body (fig 4)
Step 8/ Re-assembly is just the reverse of the above making sure ALL bushes and washers are replace in correct order. Also check While you have mounting place off car that the whole is centre has Not enlarged. If it has a replacement will need to be found. Also Check top mounting in crossember for hole enlargement. Repair to Is a much bigger job and will need welding etc or in some cases a complete replacement crossmember.
Step 9/ Once shock absorber has been replace and all nuts checked – its worth placing grease on exposed threads to held future dismantling. You can also place pieces of plastic tube over threads for greater protection.
Step 10/ Replace road wheels, tighten wheel nut, remove axle stands and lower jack.
Step 11/ Check wheel nuts are tight, replace hubcap.
Job done; move on to next front shock absorber. EASY ISN’T IT! |
|
| |
Following the good response to my last article on replacing the Upper Wishbone Bushes the easy way; I now turn my attention to the Upper Wishbone Ball Joint. Once again reading the Official Volvo Workshop Manual on how to replace the top wishbone ball joint, I was amazed how complicated and time consuming their proper method was. Perhaps historically this is why Volvo Service Costs are so high.
The method described in the Volvo Manual requires disconnecting of the brake line and the use of a Volvo Special Tool SVO 2281. In fact the whole job can be done very easily without much in the way of special tools.
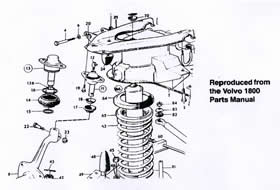
Firstly it is important to discover which type of Ball Joints are fitted and hence top wishbones. There are two types – basically early or late. It’s easy to tell which is which, EARLY WISHBONES/BALL JOINTS HAVE GREASE NIPPLES – LATER DO NOT. Neither ball joint or wishbone is interchangeable with the other but you can replace the complete unit. Early Ball joints are now very difficult to obtain new – THE CLUB STILL HAS LIMITED STOCKS, Volvo’s solution as the early ball joint is no longer available from them is to replace the whole wishbone and ball joint, at tremendous cost.
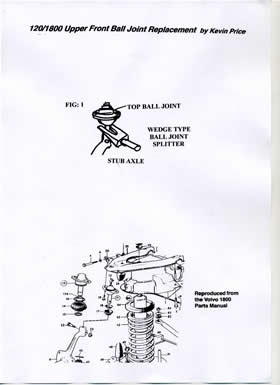
Upper Front Ball Joint Replacement – the easy way:
Method is simple but you will need a trolley jack and some large blocks of wood.
Step 1/ Lift the car by placing jack under main suspension crossmember, thus allowing the suspension to hang down.
Step 2/ Remove road wheel.
Step 3/ Place blocks of wood under lower Wishbone and lower jack so that weight is taken On lower wishbone
Step 4/ Place Axle Stands under body for Safety.
Step 5/ Remove ‘Pinch bolt’ ( No.22) and Nut (No.23) from top of stub axle.
Step 6/ Remove grease nipple (No. 12) if fitted.
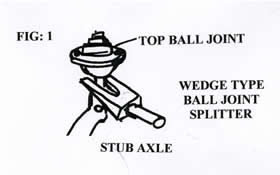
Step 7/ To remove ball joint from stub axle I use A wedge type ball joint splitter between joint and Stub axle. (See fig: 1) Alternatively use a tyre leaver. Top wishbone will easily move up out of the way as there is no weight on the assembly.
Step 8/ Remove two nuts and bolts (No’s 19 & 20) which secure ball joint to top wishbone.
Rebuilding is the reverse of the above, place some grease on shaft of new ball joint and make sure all parts are well cleaned before reassembly, particularly the whole where the ball joint fits into the stub axle. Don’t forget to tighten all nuts and bolts or forget to grease the new joint before fitting by removing the dust cover, this will help prolong the joints life and also regularly grease the joints with a grease nipple. Job done; move on to next joint. EASY ISN’T IT!
|
|
|
Reading the Official Volvo Workshop Manual on how to replace the top wishbone bushes, I was amazed how complicated and time consuming their proper method was. Perhaps historically this is why Volvo Service Costs are so high.
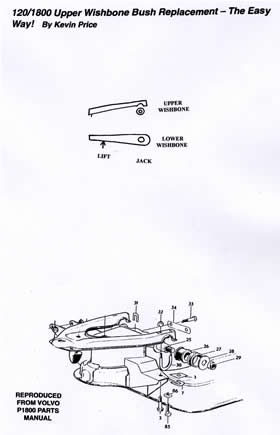
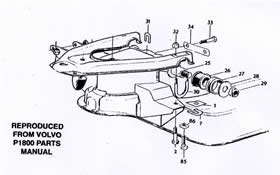
The method described in the Volvo Manual requires the total removal of the Upper Wishbone and the Mounting Shaft (No. 25) by removing the two attachment bolts No.33. When doing this care must be taken to make sure all the shims (No.31) removed are replaced back in their correct original position or steering geometry will be altered. If you do use this method I would suggest that the High Tensile bolts be replaced. A member some time ago with a P1800 had these shear following their removal and replacement. Failure of the bolts caused extensive damage to the car, luckily he was not hurt.
My Method is simple but you will need two jacks.
Step 1/ Lift the car by placing jack under main suspension crossmember, thus allowing the suspension to hang down.
Step 2/ Place Axle Stands under body for safety and remove road wheel.
Step 3/ WORK ONLY ON ONE BUSH AT A TIME.
Step 4/ Remove Nut (No.29) and washer (No. 28) from one bush
Step 5/ Undo U bolt – 2 x 3/8” UNC Nuts
Step 6/ Place second jack under lower wishbone and raise slightly – this will also make the Upper Wishbone rise, rise only just enough to allow removal of the bush.
Step 7/ Prize bush off shaft using a screwdriver and pull off with a Pair of Mole Grips. KEEP FINGERS AWAY – If bush will not move rotate bush with Mole Grips.
Step 8/ To remove old bush from metal outer, insert a Screwdriver down side of bush and prize out. Care should be taken doing this, it is better to place bush in vice if possible.
Step 9/ Clean up inner faces of metal outer for bush using a file.
REMOVING RUBBER BUSH
Step 10/ Fit new bush into metal outer. This is easy if you use washing-up liquid on bush and inner face of metal outer case. Bush will then just push in.
Step 11/ Replace bush on mounting shaft.
Step 12/ Lower jack/wishbones and replace U Bolt. Tighten 2 x 3/8 UNC nuts.
Step 13/ Replace end washer, large nut and tighten.
Job done; move on to next bush. EASY ISN’T IT! |
|
| |
|
|
|